
Slutty brownies are the dessert that answers the question nobody should have to ask: chocolate chip cookies or brownies?
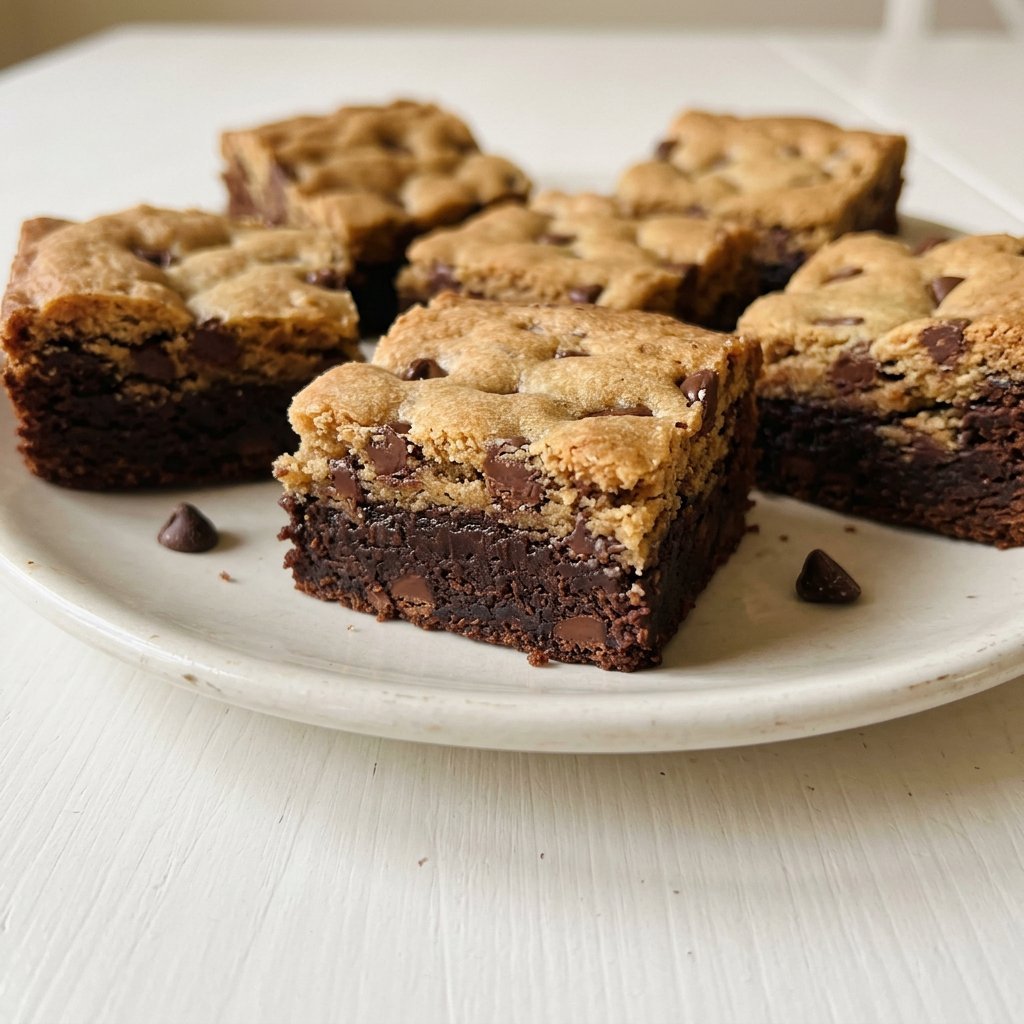
These layered bars give you a chewy chocolate chip cookie base, a full layer of Oreo cookies packed side by side, and fudgy brownie on top, all baked into one impossibly indulgent square.
The first time you pull them out of the oven, the brownie top will be crackly and glossy, and when you cut into them, you will see three distinct layers that make people lean in for a closer look before grabbing one.
Everything here is made from scratch, no boxed mixes. The cookie layer uses an extra egg yolk for chewiness, the brownie layer uses both melted dark chocolate and cocoa powder for depth, and the Oreos in the middle stay surprisingly intact during baking, creating a distinct creamy crunch between the two cookie layers.
They need a long bake and a long cool, so plan ahead. But the actual hands-on time is only about 30 minutes.
Ingredients You’ll Need
Chocolate Chip Cookie Layer
- 3/4 cup unsalted butter (168g), softened – the base of the cookie dough; it needs to be truly soft, not melted, for the right texture
- 1/2 cup brown sugar (105g) – adds chewiness and a caramel-like depth
- 1/2 cup white sugar (100g) – helps the edges crisp slightly while the center stays soft
- 1 large egg – provides structure
- 1 large egg yolk (discard the white) – the extra yolk is the secret to a chewier cookie layer; using two whole eggs would make it more cakey, which is not what you want here
- 1 teaspoon vanilla extract – rounds out the sweetness and adds warmth
- 1 1/2 cups all-purpose flour (188g) – the structure of the cookie base
- 1/4 teaspoon salt – balances the sweetness and enhances the chocolate
- 2/3 cup chocolate chips (120g) – semi-sweet or dark; do not add extra because it makes the brownies harder to slice cleanly
Oreo Layer
- 28 Oreo cookies – standard Oreos, not double-stuffed (though those work too if you prefer more cream filling)
Brownie Layer
- 1/2 cup unsalted butter (112g), cubed – cut into small pieces so it melts evenly with the chocolate
- 6 oz dark chocolate (170g), 50-70% or semi-sweet – the higher the percentage, the more intense the brownie; do not go above 70% or the brownie will be too bitter
- 1 cup granulated sugar (200g) – sweetness to balance the dark chocolate
- 2 large eggs – provides richness and that fudgy texture
- 1/2 cup all-purpose flour (63g) – less flour than the cookie layer, which keeps the brownie dense and fudgy
- 1/4 cup cocoa powder (23g) – adds concentrated chocolate flavor on top of the melted chocolate
- 1/2 teaspoon salt – essential in the brownie layer to keep it from tasting flat
When buying chocolate for the brownie layer, bars are better than chips. Chocolate chips contain stabilizers that prevent them from melting smoothly, while chopped chocolate bars melt into a silky, glossy batter. A 50 to 60% dark chocolate gives you rich flavor without bitterness.
What You Need
- 9×13 inch baking pan – the right size for this recipe; an 8×8 works if you halve it
- Parchment paper – leave an overhang on the sides so you can lift the whole thing out after cooling
- Large mixing bowls – one for cookie dough, one for brownie batter
- Electric mixer or whisk – for creaming the butter and sugar
- Heatproof bowl – for melting the chocolate and butter
- Rubber spatula – for spreading the layers evenly
- Sharp knife – for slicing after cooling
Step-by-Step Cooking Guide
While your finished dish may not look exactly like the images in this post, following these instructions will give you the same delicious SLUTTY BROWNIES. So please follow with me!
Preheat your oven to 350 degrees F (180 degrees C). Lightly grease your 9×13 inch pan, then line it with parchment paper, leaving an overhang on the long sides. Greasing the pan first helps the parchment stick down so it does not slide around when you spread the batter.
Start with the cookie dough layer. In a large bowl, beat together the softened butter, brown sugar, and white sugar until light and fluffy.
This creaming step incorporates air into the butter, which helps the cookie layer bake up with a slight chew rather than a dense brick. Beat in the egg, the extra egg yolk, and the vanilla extract.
Remember, you are using one whole egg plus just the yolk of a second egg. Discard the white or save it for another use.
With the mixer on low speed, beat in the flour and salt until just combined. Do not overmix at this point or the cookie layer will be tough.
Turn off the mixer and stir in the chocolate chips by hand using a rubber spatula. Spoon the cookie dough into the prepared pan and spread it into an even layer with your spatula. The dough will be thick, so take your time getting it flat and even across the bottom of the pan.
Now place the Oreo cookies on top of the cookie dough in neat rows. You should get about 7 rows of 4 cookies across.
If there are gaps, break a few cookies in half and fill them in so the entire surface is covered. Press the Oreos down just slightly into the cookie dough, but do not push them all the way in.
Next, make the brownie batter. Finely chop the dark chocolate and place it in a heatproof bowl with the cubed butter.
Microwave on medium power in 45-second intervals, stirring between each interval, until the mixture is completely smooth. Never microwave chocolate on high power because it can scorch and become grainy even though it looks fine on the outside.
- As King Arthur Baking explains, low and slow is the way to melt chocolate for a smooth, glossy result.
Let the melted chocolate and butter cool for about 5 minutes. If you add eggs to hot chocolate, they will scramble on contact.
Once the mixture is warm but not hot, whisk in the sugar and eggs until smooth and glossy. Then whisk in the flour, cocoa powder, and salt until just combined.
If your cocoa powder or flour is lumpy, sift them before adding. Overmixing the brownie batter develops the gluten in the flour, which makes the brownie cakey instead of fudgy.
Spoon the brownie batter over the Oreo layer, dropping spoonfuls evenly across the surface. Then gently spread it into a smooth layer with your spatula.
Spreading from spoonfuls is much easier than dumping all the batter in the center and trying to push it outward, which can shift the Oreos underneath.
Bake for 37 to 45 minutes. Start checking at the 35-minute mark by inserting a toothpick into the brownie layer.
It should come out clean or with a few damp crumbs, not wet batter. If you give the pan a gentle nudge and the center wobbles significantly, it needs more time. The brownies are very thick, so the bake time is longer than you might expect.

The Most Important Step: Cooling
Let the brownies cool completely in the pan for at least 4 hours before slicing. This is genuinely the hardest part.
If you try to cut them while they are still warm, the layers will smear together and the brownie top will tear. Patience here gives you clean, distinct layers that look as good as they taste.
After cooling, use the parchment paper overhang to lift the entire slab out of the pan and onto a cutting board. Cut with a sharp knife, wiping it clean between cuts for the neatest slices.
When Things Do Not Go as Planned
Brownie top is too gooey after baking. They need more time.
Cover with foil and bake for another 5 to 10 minutes. The foil prevents the top from over-browning while the center catches up.
Cookie layer is underbaked. This usually happens when the brownie layer is thick and the oven runs cool.
Check with a thermometer; ovens can be off by 25 degrees or more. Use the middle rack for the most even heat.
Brownies are hard to slice. They have not cooled long enough.
Four hours is the minimum. If you are short on time, refrigerate the pan for 1 to 2 hours to speed up the setting process.
Chocolate seized when melting. Even a tiny drop of water can cause chocolate to seize and become grainy.
Make sure your bowl and spatula are completely dry. If it seizes, you can try adding a tablespoon of vegetable oil and stirring vigorously, which sometimes smooths it out.
Serving Ideas
These are rich enough to stand alone, but a scoop of vanilla ice cream on top of a warm brownie turns them into a proper dessert situation. A drizzle of warm caramel sauce or hot fudge adds even more indulgence.
Cold milk is the obvious pairing. For a party, cut them into bite-sized squares and arrange on a platter; they look impressive and people love the layered reveal. Explore more dessert ideas in our desserts and baking section.
Storage
Room temperature: Store in an airtight container for up to 4 days. Layer parchment paper between stacked brownies to prevent them from sticking together.
Freezer: Wrap individual brownies tightly in plastic wrap, then place in a freezer bag. They freeze well for up to 3 months. Thaw at room temperature or warm briefly in the microwave for 15 seconds.
Reheating: A quick 10 to 15 second zap in the microwave brings back that just-baked warmth and makes the chocolate chips gooey again. For longer-term food storage guidelines, refer to the USDA’s food safety resources.
Common Questions
Can I use boxed brownie mix? You can, but the homemade brownie batter is what makes these special. Boxed mix works in a pinch but will not have the same depth of chocolate flavor.
Do I need to remove the Oreo cream filling? No. The cream filling softens slightly during baking and adds a nice textural contrast. Leave the cookies whole.
Why does the cookie layer use one egg plus one yolk? The extra yolk adds fat and richness without extra liquid, giving you a denser, chewier cookie base. Two whole eggs would make the cookie more cake-like, which is not what you want under all those other layers.
Can I make these a day ahead? Absolutely, and they are actually better the next day because the layers have time to set and the flavors meld. Just store them covered at room temperature.
After serving a great dinner from our chicken recipes, these brownies are the perfect way to finish the night. Slutty brownies are the kind of dessert that disappears from whatever table you put them on.
Three layers of chocolate indulgence, all from scratch, and worth every minute of waiting for them to cool. Make a batch this weekend and watch what happens.
For more dessert ideas that impress, check out our desserts and baking collection. You might also love our Cheesecake Brownies, Caramel Apple Cheesecake Bars, and Cinnamon Roll Cake.